
When the handspun, handwoven shirt was discovered in the closet, damaged, my heart hit the floor. The shirt had apparently been slammed in a car door, where weather stripping sliced it like a knife. The right shirt front had two great slits that ran up from the hem, five and eight inches long. With such damage, the garment had to be stabilized and repaired before it could be handled much.
What to do?
Alden’s Pendleton-style shirt had been an ambitious undertaking, and the rest of the shirt was in nearly mint condition. I had to fix it.
I started this repair project with nothing left except the shirt, a 35-year-old written description, and photographs.
There were no fibers, no slivers, no yarns left. It was “square one” time.
The Original “Shirt Project”
The Yarn
It all started with about three pounds of New Zealand Romney fleece. After scouring, I dyed the locks separately in green, blue, red, and a dark chocolaty brown. The locks took the dye in their typical manner with a slight variation in depth of shade. Wool from a natural coal-black Karakul lamb produced an additional lustrous black accent yarn.
I carded the locks into solid-color batts, then recarded into solid-color slivers. My carding machine allows me to create a sliver preparation by running the batt back through the machine and pulling it through a cone as a continuous sliver rather than collecting on a drum to make a batt. The soft, ropey sliver can be wound onto a wooden dowel to make a barrel-shaped “bump” ready for spinning. From these slivers, I spun a total of 8,208 yards of woolen singles on my Amos Motor Spinner. The warp and weft yarns remained as singles, lustrous and soft, averaging 3,000 yards per pound. They averaged five to six twists per inch.
I sized the warp singles with double-strength unflavored gelatin before they went onto the loom. There are a number of reasons to use sizing. It makes the yarn stiff, smooth, and, in a woolen-style yarn, more resistant to abrasion from the heddles and reed. The sett can be closer than if unsized. Another weaver’s benefit is the yarns can be sleyed without a hook. The sizing completely rinses out of the cloth at a later time.
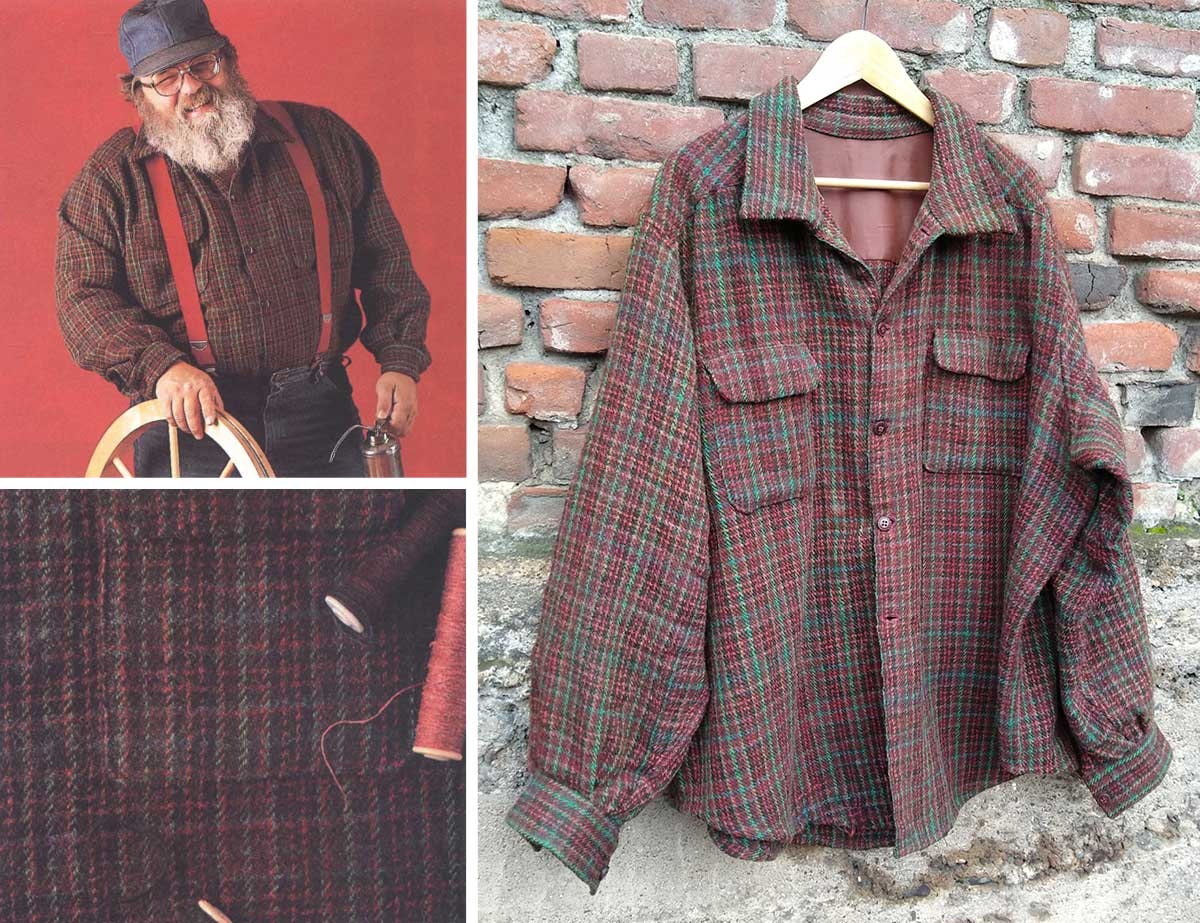
Stephenie spun, wove, and sewed “A Shirt for a Fellow Spinner” in 1986. The original caption read, “The lucky recipient, the Famous Amos (aka Alden Amos) is shown here wearing his specially crafted shirt. When not posing for the camera, Alden can be found in his workshop hand crafting spinning wheels, and just feet away, Stephenie operates ‘Jaws,’ the remarkable carding machine.” Decades later, she undertook major repairs to restore the shirt. Photos at top left and bottom left: Joe Coca. Photo at right: Stephenie Gaustad
The Cloth
I put the sized yarn on the loom at 19 inches wide in a 12-dent reed, double-sleyed at 24 ends per inch. The plaid pattern was woven tartan-style for 9 yards, meaning that the structure was a 2/2 twill and the color sequence in the warp was mimicked by the weft. The cloth was woven to square (i.e., an equal number of ends and picks per inch). Off the loom, the sizing was rinsed out and the fabric was fulled in the washing machine, dried, and then steam-pressed. The finished fabric width measured 16 inches, the target width for the shirt fronts, back, and seamed sleeves.
The Shirt
The main pattern pieces were pretty straightforward to cut except for the sleeves, which were wider than 16 inches. I invisibly seamed the sleeve pieces edge-to-edge with two fabric wedges. This added width and length to the arms. From here, the process was simply to cut and sew (using flat-felled seams) the whole 9 yards into a classic man’s shirt.

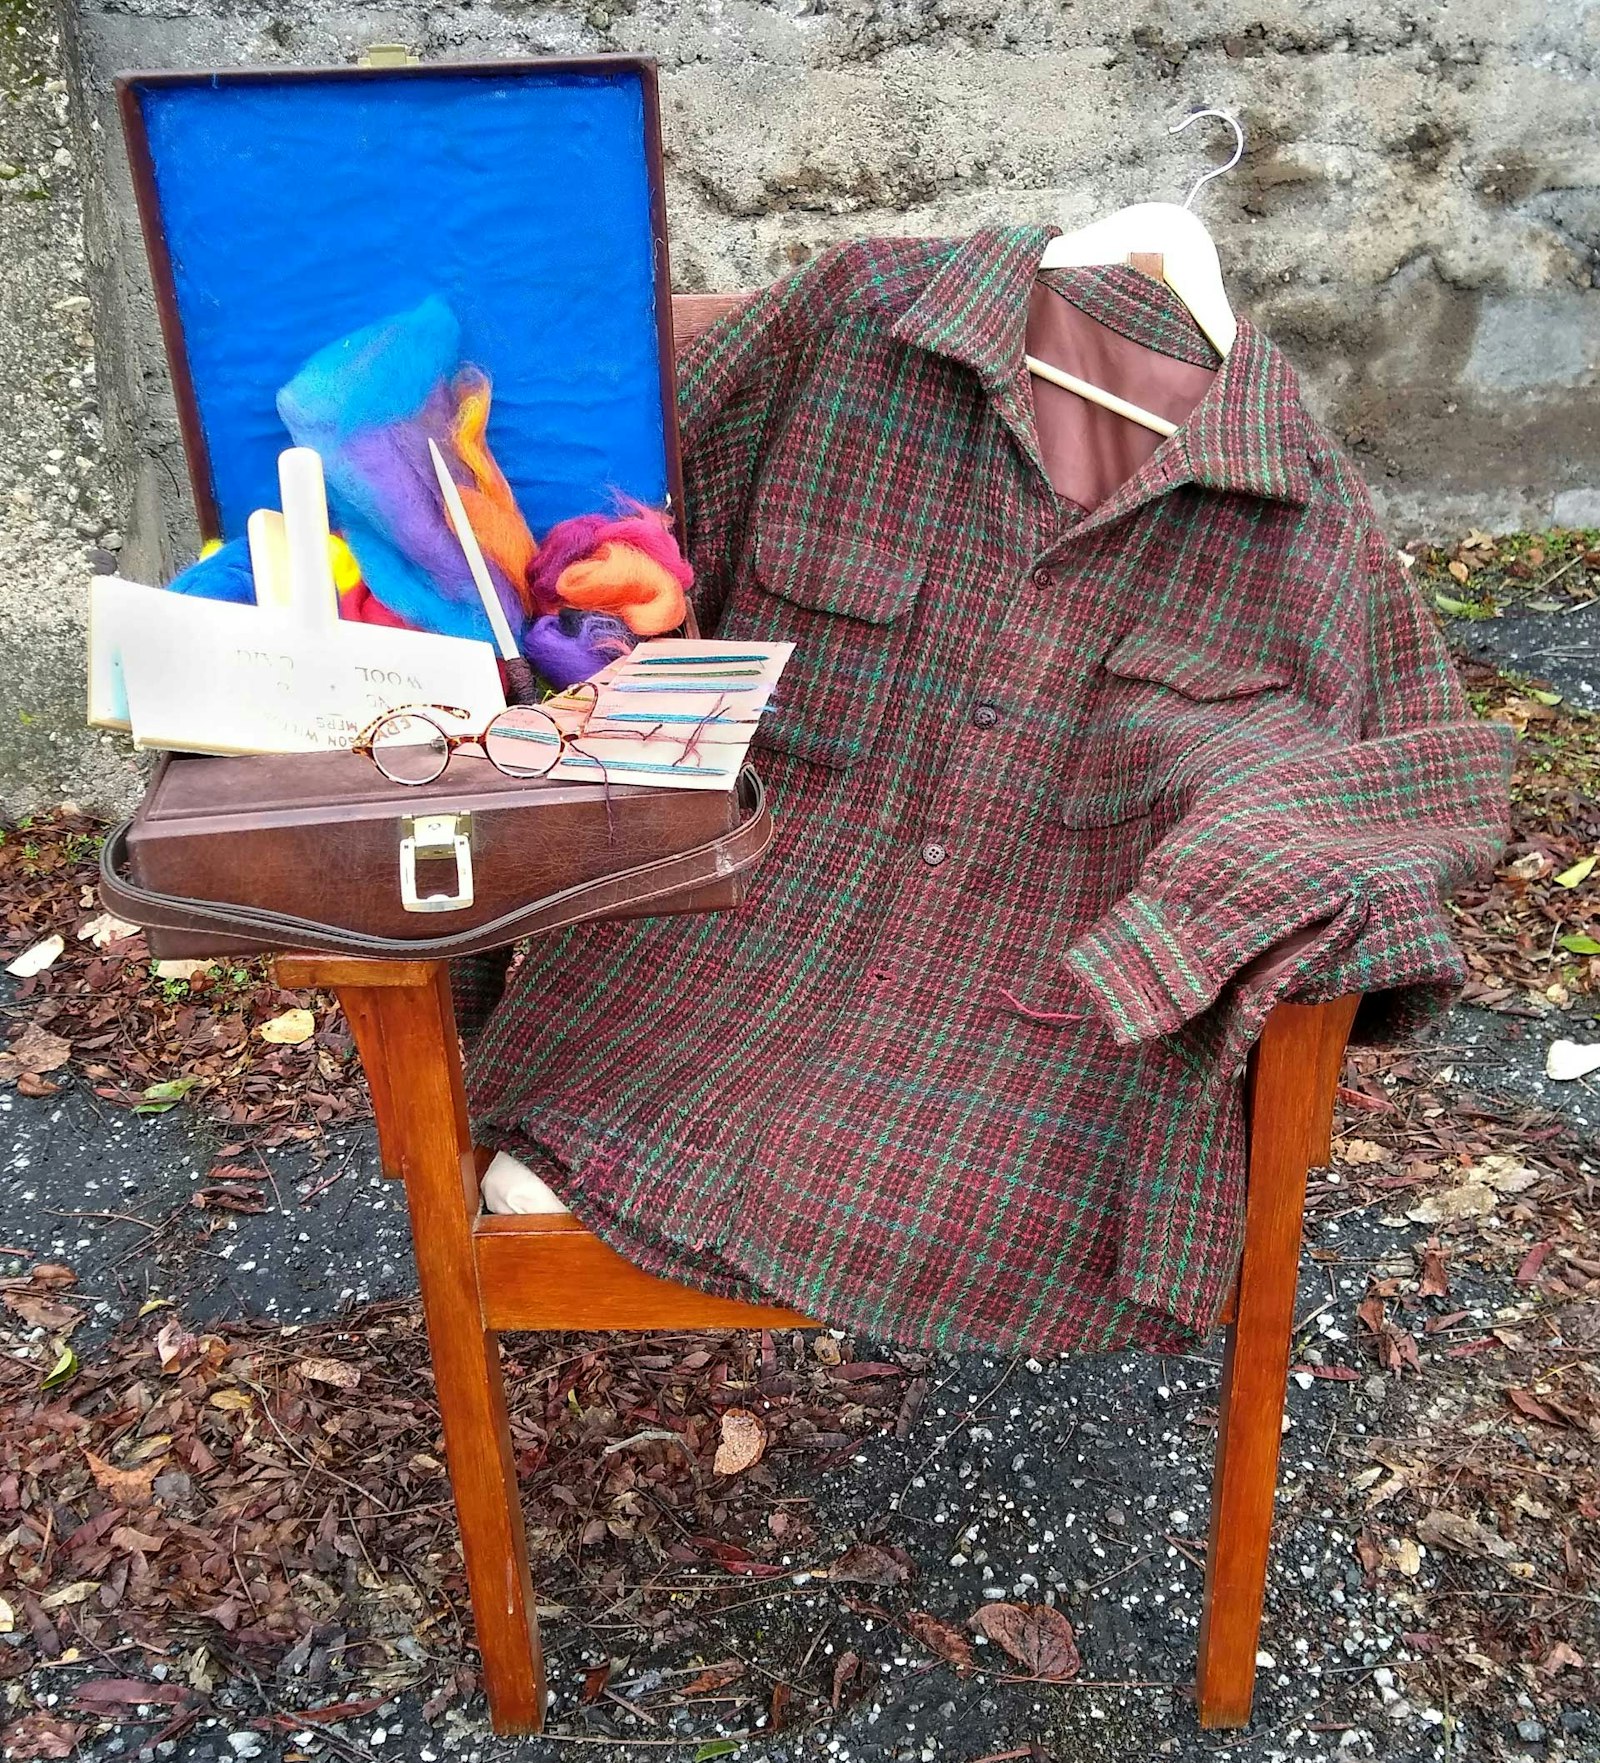
Brightly colored slivers, a pair of wool cards, and good glasses composed my mending kit. Photo by Stephenie Gaustad
Necessary Help
The tools used for this work are simple: sewing scissors, a darning needle, and a magnifying full-spectrum gooseneck lamp, essential for seeing the process. Even with supplemental illumination, plenty of natural light is a necessity. I found that I could not work for long periods of time but had to stop, put the project down, and return after some period of rest. It takes eyes and a brain to see what needs to be done and what needs to happen next.
Beginning the Repair
I began the repairs by gathering materials. Yarns to mend the shirt needed to be color blended to mimic the variable colors of the originals. The shirt’s dark tones tend to swallow a lot of color, which made the color matching a bit more forgiving. The repair yarns could be similar to rather than a match to the original saturated colors. This was really helpful.
A variety of strong solid-colored slivers assembled themselves into my workbox: scarlet, yellow, blue, and black. Soon a pair of handcards and a high-whorl hook-top spindle hopped in, too. I used the cards for blending, sampling, and matching yarn colors. The hook-top spindle, a familiar spinning tool, easily makes a couple yards of yarn from a single rolag. This would make for ready sampling and an expanded assortment of colors.
The time came to sit down and spin to match color and size. I spun the yarn worsted, with a firm pinch on the point of contact between twist and fiber. This produced a smooth yarn with a nap. Ends of the fibers pointed back along the yarn, making it easy to use for darning and fabric repair when I threaded the needle from the lead end of the yarn. If used from the other, wrong end, the repair yarn would end up fuzzy, back-combed, and recalcitrant. All the mending yarns were oriented so their nap was smooth.
I stored the spun samples on a rectangle of thick paper cardstock as I worked. Potentially useful color samples were wound onto these paper cards, and my singles mending collection grew.
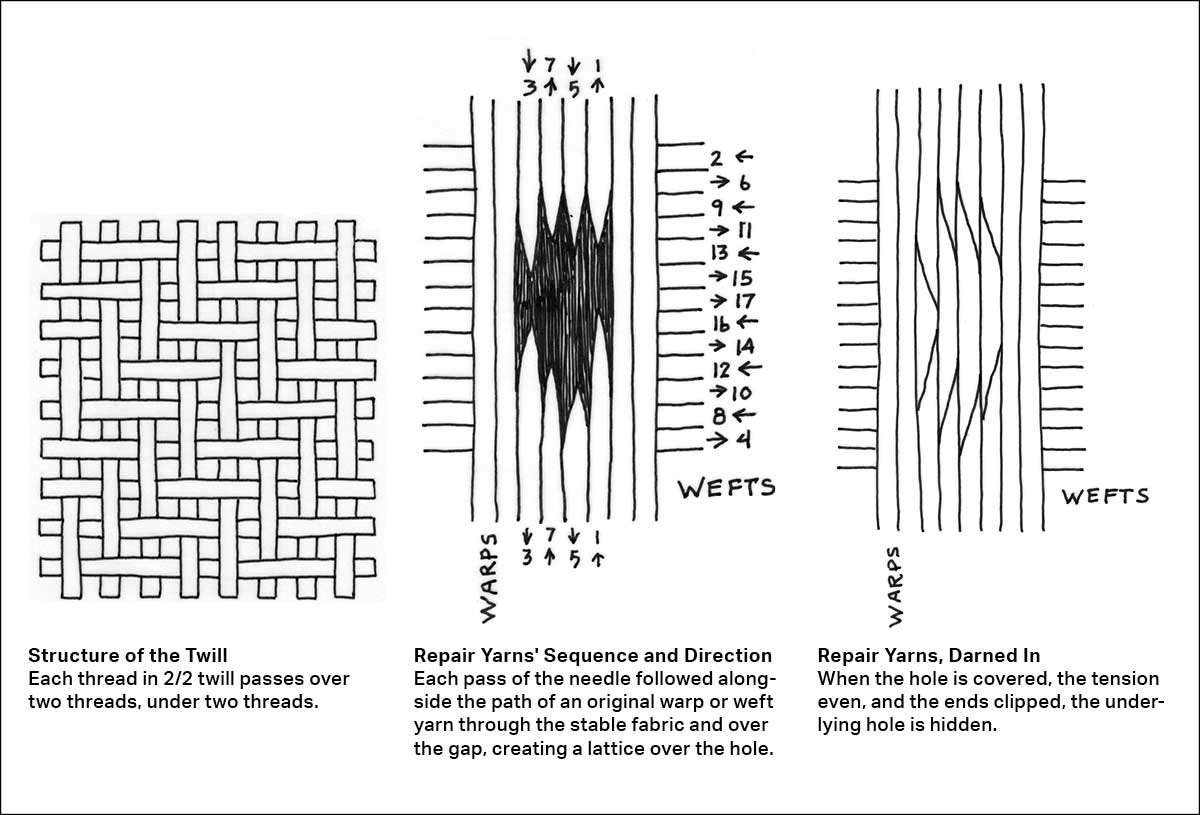
Illustrations by Stephenie Gaustad
Repair by Leaps and Bounds
At the outset, I took some white sewing thread and made long running stitches around the damaged areas to mark and stabilize the damage. This let me handle the fabric and readily see the extent of the job.
My general approach to reweaving is to first see the hole. Sometimes you have to hold the piece up to the light to find it. Then I proceed to systematically close the hole from its perimeters, passing the threaded needle toward the north, east, south, and west, while maintaining the original fabric pattern and colors. I closed the fabric tears from the top of the cut down toward the hem.
Mending, or invisible reweaving, involved taking a cut length of yarn from the card, determining the direction of the nap so that I could keep the yarn smooth, threading it on the needle, and moistening the yarn to set the twist. I let the damp yarn dry a bit before using it.
There is an underlying logic to the 2/2 twill structure: every yarn, in both warp and weft, goes over two yarns and under the next two. In this manner, I rebuilt the fabric.
The beginning of a yarn was laid next to an existing firmly held yarn, then leapt the gap. The beginnings and ends of the repair yarn remained on the surface of the fabric to be clipped after the repairs were completed.
Thus, the existing fabric structure was duplicated to give each new repair yarn a footing so that it could cross a void for a short span and then find more solid structure for another footing. In this manner, the missing or damaged weft and warp yarns were replaced and the voids reduced until they disappeared. Tails of the yarn remained for a gentle pull as the gap was sealed. Then I cut them.
Looking at the shirt now, I appreciate how much time is invested in this garment. It easily represents hundreds of hours work in just the making of it, even before the repair time. With this much already committed to the shirt, it was not a difficult decision to spend more hours mending and giving it new life. I certainly look forward to that moment when I can slip my arms down those sleeves and get a proper hug.
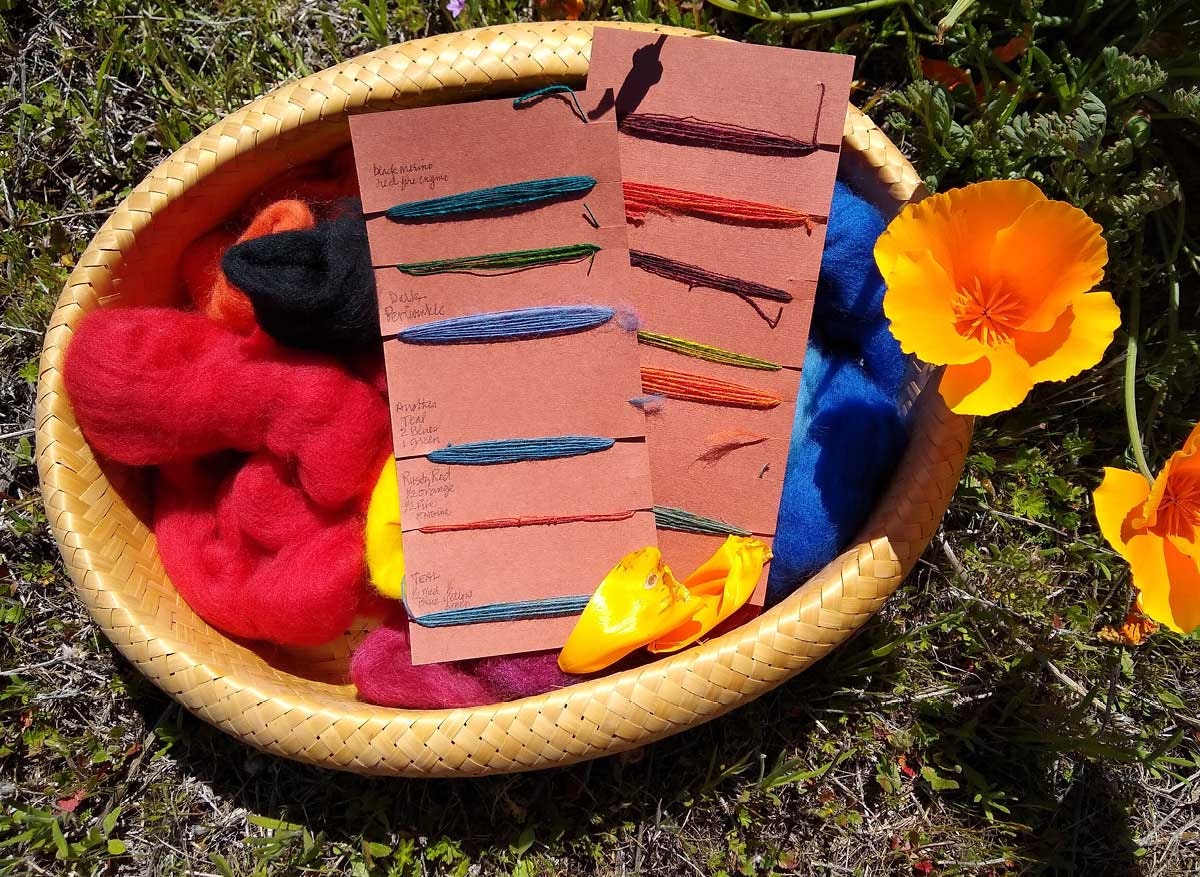
Stephenie used carded slivers to spin singles yarns for mending. Photo by Stephenie Gaustad
Words of Wisdom
- Treat each damaged area as an entity. Don’t jump around putting out fires. Finish each restoration before going on to another area. Repair and smooth the damage in a swath across the cloth.
- It is slow, methodical work, nearly invisible when done well.
Resources
- Gaustad, Stephenie. “A Shirt for a Fellow Spinner.” Handwoven, September/October 1986, 76–77.
- —. “Sizing Matters: A Singular Experience.” Spin Off, Spring 2018, 24–28.
For better than 40 years, Stephenie Gaustad has taught classes in spinning, weaving, and dyeing. Her articles have appeared in Handwoven; Shuttle, Spindle & Dyepot; Spin Off; PLY; and more. Her replicate textiles hang at the Pueblo Grande Museum in Phoenix, Arizona. She illustrated The Alden Amos Big Book of Handspinning, and her most recent book, The Practical Spinner’s Guide: Cotton, Flax, and Hemp, was released in 2014.
This article was published in the Summer 2020 issue of Spin Off.