

Contents
I love my spindles. I can’t praise them enough. Whenever I meet someone who seems less enthusiastic about them, I can’t help but wonder if I could convert them to spindle fanaticism by sharing a few helpful tips that can make spindle spinning even more enjoyable. Here are some of those tips for winding yarn onto the spindle.
One: Proper Winding-on
You always want to turn the spindle to wind on yarn. If you wrap the yarn around the spindle by moving the hand holding the yarn, you are adding or subtracting twist to the yarn. When your cat or toddler unwinds a roll of toilet paper across the bathroom floor and down the hall, how do you wind it back up? Do you grab a section of the paper and begin wrapping it around the cardboard core? If you haven’t done this before (lucky you!), give it a try. The toilet paper will begin to twist up. Instead you probably turn the cardboard core, rolling it, to wind up the toilet paper without inserting twist. This same principle applies to handspun yarn.
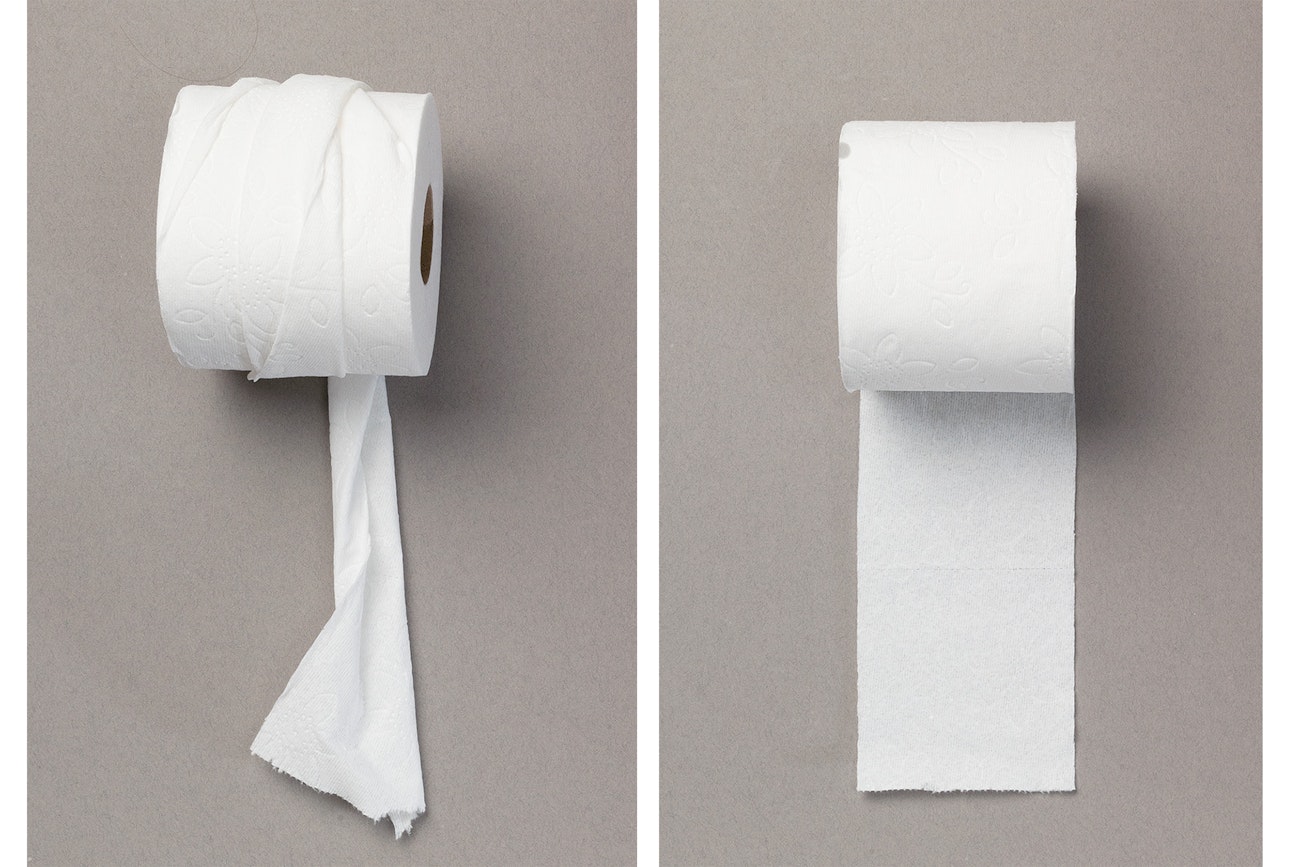
Want to avoid changing the twist in your yarn? Turn the spindle to wind on. Photos by Joe Coca unless otherwise noted
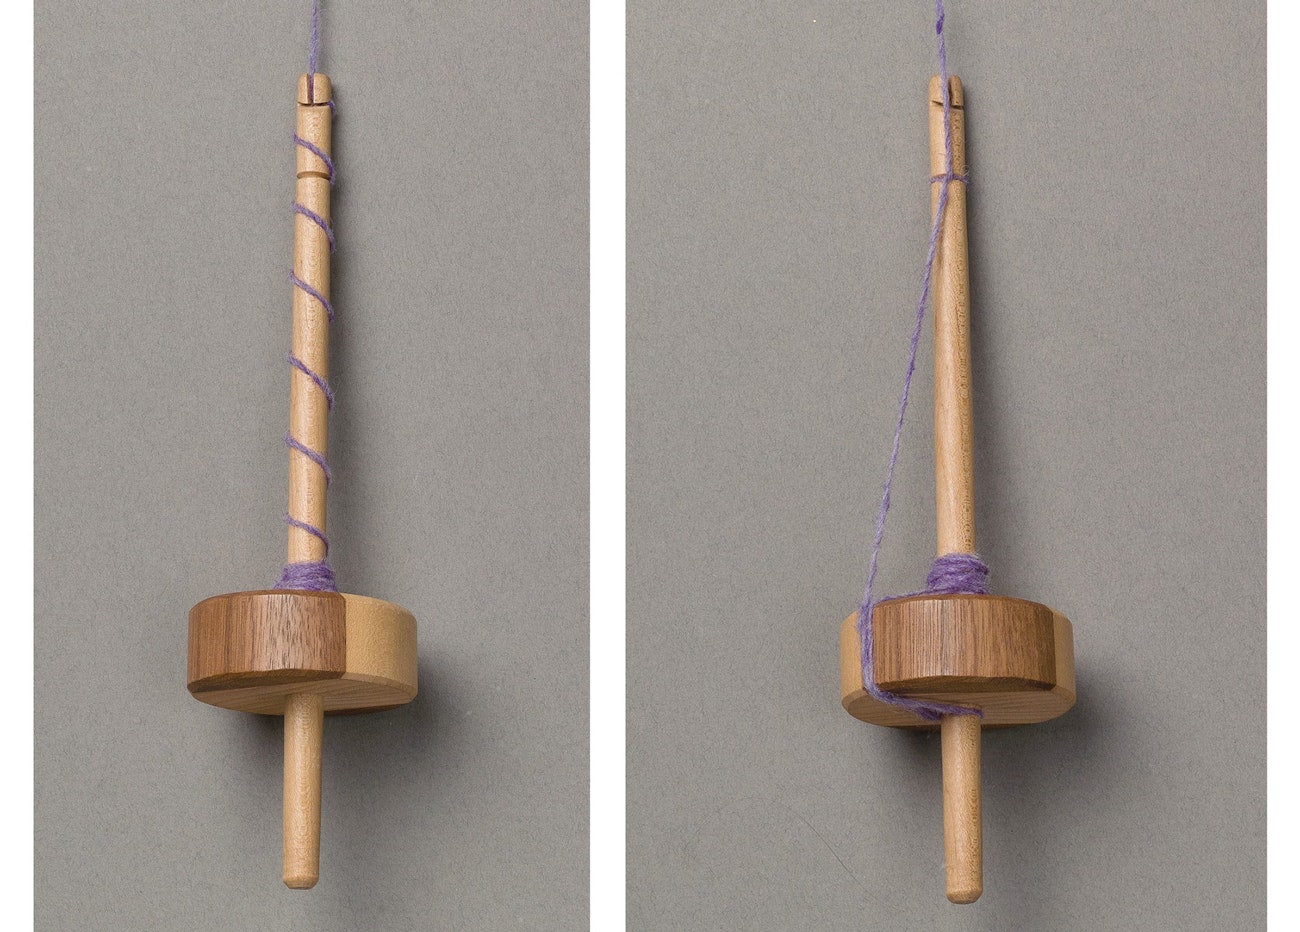
Two: Direction of Wind-on
The direction in which you wind on is important to ensure that the yarn will not loosen and start to unwind itself as you are spinning. Wind on yarn by turning the spindle in the same direction you are spinning. Centrifugal force encourages the yarn to remain snug. Think of it as spinning into the cop, as opposed to spinning out of the cop (unwinding). Spinning clockwise? Turn the spindle clockwise to wind on. Technically, the yarn is moving counterclockwise around the spindle, but by focusing on the direction the spindle moves, you eliminate confusion for yourself. You just need to make sure your spindle is always moving in the same direction in which you are spinning (or plying).
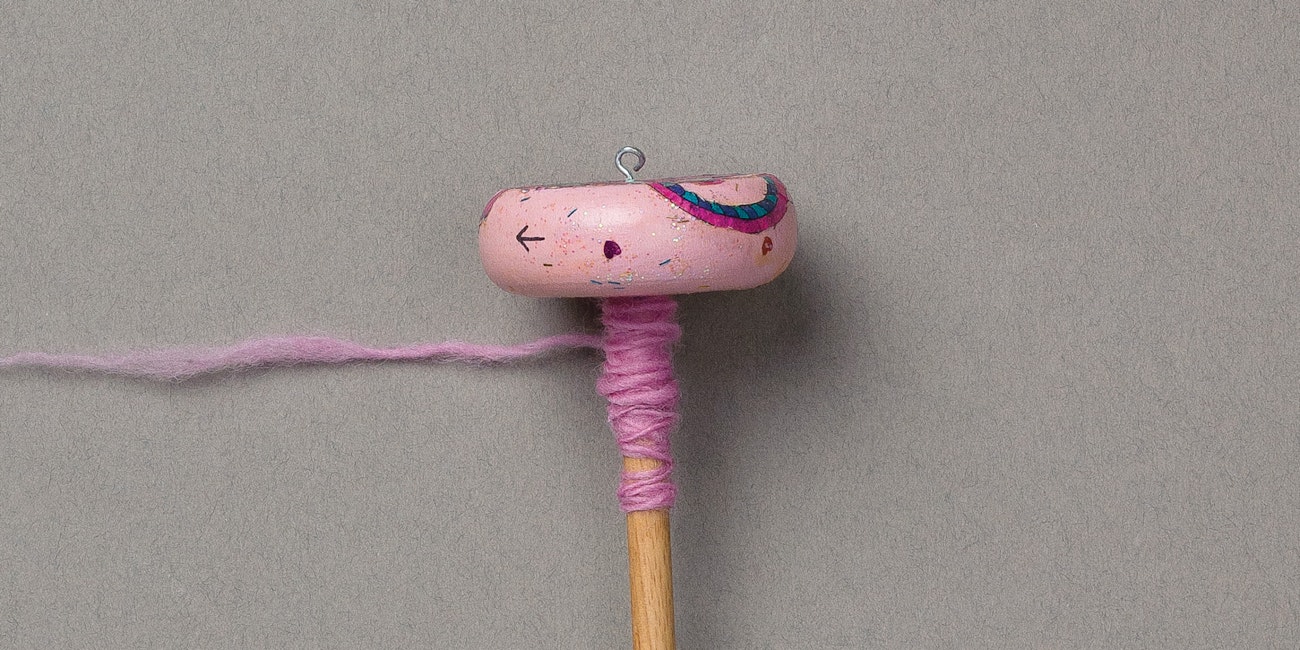
In this photo, the arrow on the spindle whorl shows the direction the spindle is turning to wind on the yarn.
Three: X Wind-on
The X wind-on can serve several purposes: It keeps the cop neat and tidy. It allows for faster winding on. And on some spindles, it is the only way to control where the cop stays on the spindle shaft. I have Lady Ann and Victorian Lady spindles in mind in particular—what Bette Hochberg calls a “carved one-piece spindle.”
To start an X wind-on, turn the spindle in the correct direction to wind on, but angle the yarn between 25 and 55 degrees toward the whorl so that the yarn begins to spiral around the shaft or cop. (The angle varies as the cop grows.) When you reach the whorl, change the direction of the angle and spiral back to the other end of the cop. Continue to wind up and down the cop in this manner. (If you fish, this may remind you of the way your fishing reel winds on.)
The yarn winds on more quickly in this way because it travels over a longer distance with the same turn of the spindle than if the wraps were stacked vertically. One turn of the spindle using the X wind-on can take up as much yarn as four turns of the spindle stacked vertically. This technique gets the name “X wind-on” from the fact that the two paths of the yarn will cross each other at some point on the cop, creating an X.
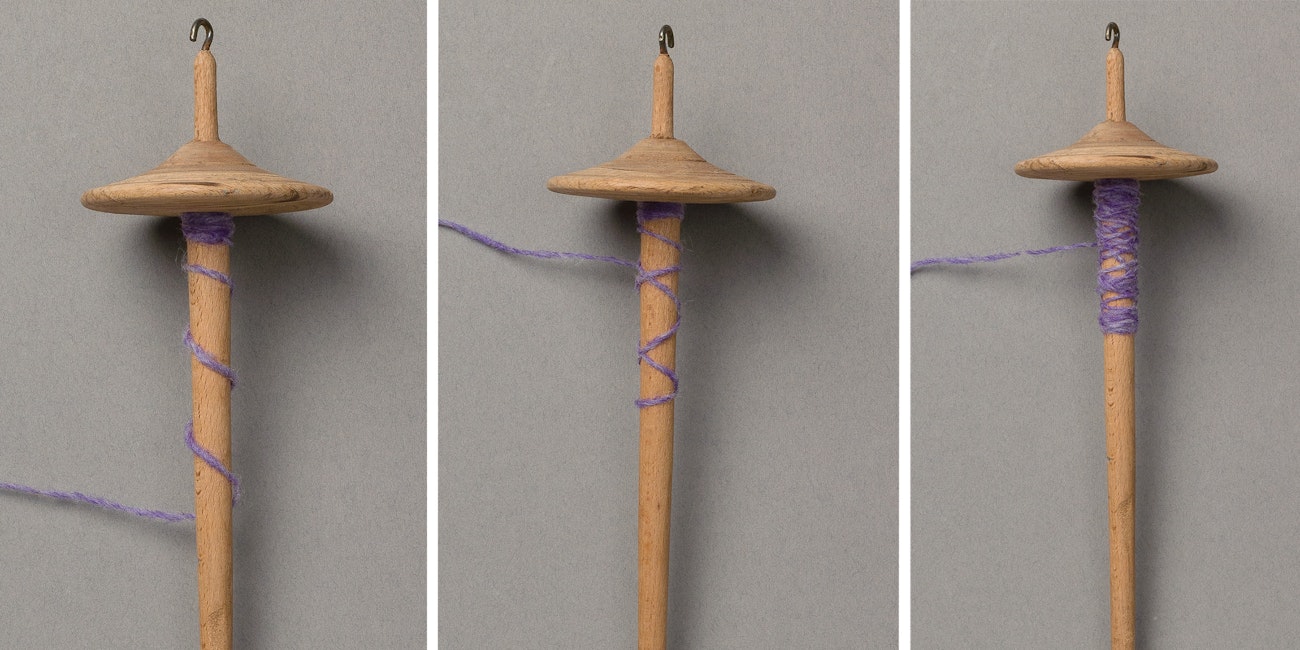
To make an X wind-on, spiral the yarn down the shaft, then back up to the top of the cop. The crosses in the cop give this wind-on its name.
Four: Figure-eight Wind-on Preparation
Because of the active twist in newly spun singles, winding on anything more than a foot of yarn can get tricky. If you don’t keep the yarn taut, it starts to twist and kink and tangle. Soon you find yourself doing bizarre calisthenics in an attempt to grab the spindle to wind on without letting the yarn tangle on itself. One way to manage this nicely and still be kind to your body is to use a preliminary figure-eight wind-on, which controls the yarn while bringing the spindle back to your hand so you can then wind the yarn onto the spindle.
I’ve seen many variations on this technique. I’ll show the method I use, but feel free to use any combination of fingers or movements that give you the same end result of tensioned yarn.
Let’s say I have spun 3 feet of singles, and the spindle is now down near my feet. I pull the yarn and spindle in toward my body so that the spindle rests against me and stops moving. This prevents the spindle from adding or subtracting twist. Next, I pinch off my drafting triangle between the index and middle fingers of the hand that holds the fiber. I twist my wrist so that I can catch the yarn behind my thumb. Then I twist my wrist in the opposite direction and catch the yarn behind my pinkie. I continue to alternate catching the yarn behind my thumb and pinkie, creating a figure eight around my fingers until I am within a foot or less of the spindle. At this point, I can pick up the spindle by the shaft with my free hand and wind the yarn off my fingers and onto the spindle.
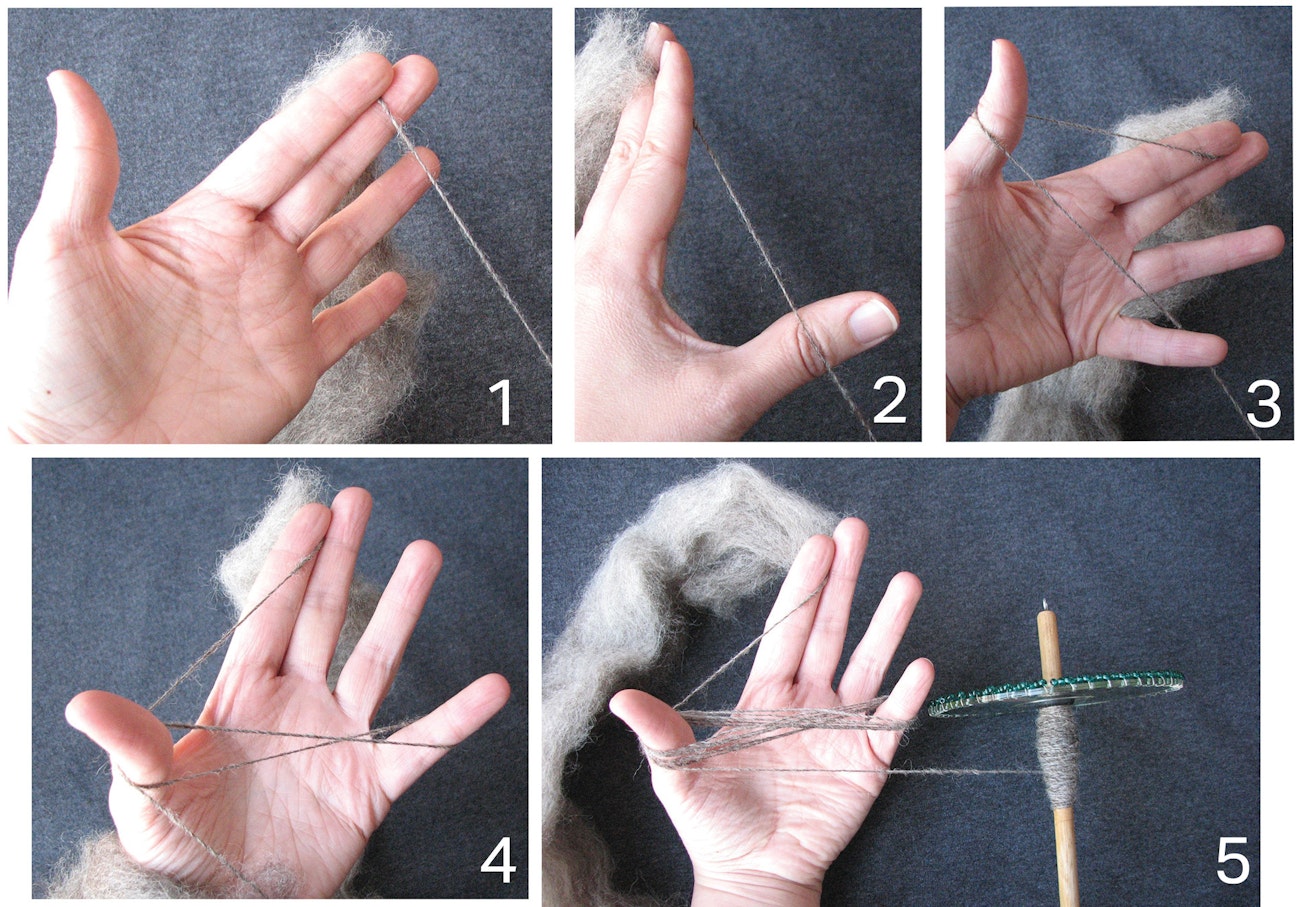
1) Pinch off the drafting triangle. 2) Twist your wrist to catch the yarn behind your thumb. 3) Twist your wrist to catch the yarn behind your pinkie. 4) Alternate catching the yarn behind your thumb and pinkie, creating a figure eight around your fingers, until you are within a foot of the spindle. 5) Pick up the spindle by the shaft with your free hand, and wind the yarn off your fingers onto the spindle. Photos by Andrea Mielke Schroer
Five: Candy-cane Spiral for Low-whorl Spindles
When I was first learning to spin, on a low- or bottom-whorl spindle, I was told to take the yarn under the whorl and once around the shaft before coming up to the tip of the shaft to put on a half hitch. This seems like a quick and efficient way to get to the top of the shaft . . . until you see someone spinning with a top-whorl spindle and using a thigh-roll to get lots of twist quickly. Adding lots of twist quickly equals less time spinning, which means I get to my knitting or weaving faster. It is very appealing. But when I tried it, I couldn’t roll the low-whorl spindle against my thigh because that yarn coming from the bottom of the spindle up to the half hitch was in the way.
Enter the candy-cane spiral. If I spiral my leader up the shaft of the spindle, much like the stripes on a candy cane, they hug the shaft well, preventing slippage or unwinding while spinning, yet are out of the way, allowing me to do a thigh-roll with a low-whorl spindle. A 35- to 45- degree angle on the spiraling yarn works best. A steeper angle doesn’t grip as well and allows for slippage of the yarn; less of an angle just takes longer to do and doesn’t provide any additional advantage.
There is a little bit of friction on the yarn from your hand and thigh during a thigh-roll, but for most yarns, the result of the friction is negligible. I usually only thigh-roll once between wind-ons, maybe twice if I get interrupted while drafting. The slight friction on the yarn that results from this is only an issue for me if I am spinning a yarn that I want to be very smooth and lustrous, such as a worsted silk yarn. The friction from the thigh-roll may make the yarn look a little hairier, but for 90 percent of the yarn I spin, it isn’t enough of an issue to worry about.
Left: Spiral the yarn up the shaft at a 35° to 45° angle. Right: Wrapping the yarn directly from the whorl to the tip of the shaft prevents a good thigh-roll.
Try This At Home
These aren’t rules or spinning laws, just suggestions I have accumulated from years of research and experience. Experiment with these tips and take away the things you find useful and helpful. Then go and spread some spindle love.
Resources
- Apply some of the same principles on to winding cops on support spindles in Her Handspun Habit: How I Wind a Cop on My Supported Spindle.
- Refine the techniques with your charkha spinning in Roving Reporter: Tips for a Tidy Charkha Cop.
This article was published in the Fall 2014 issue of Spin Off; first published online July 3, 2020; updated June 12, 2026.