When I signed up for a Master Gardener class offered by the University of Idaho, I envisioned a beautifully landscaped yard, a kaleidoscope of flowers blooming throughout the summer, and winter days perusing garden catalogs. Instead, I found weeds.
One of the first books I was introduced to was Weeds of the West (University of Wyoming, 1996) that I used to identify the bounteous crop of undesirables in my own backyard. A few months later, a friend asked me a question about natural dyeing, and as I searched my bookshelf for an answer, I rediscovered Anne Bliss’s book, North American Dye Plants (Interweave, 1993). I had never used the book since I didn’t recognize any of the plants. As I flipped the pages of the book, however, I realized that with my newfound knowledge of weeds, many of Anne’s plants were now familiar to me.
Thus began a two-year exploration of dyeing with weeds. To start, I made a list of potential dye candidates from plants I had already identified. As it was already July, I began with plants that bloomed in the late summer and were listed in the book as nonfading or lightfast. I wanted to avoid fugitive dyes, which produce a nice color but fade if exposed to bright light. I did all my dyeing in August and September.
My first dye list included twenty-four plants, although I actually dyed with only about twenty of them that summer. The following spring, I added twenty-four more plants to my list, this time choosing spring and early-summer bloomers. I was surprised when many of the fall plants produced a very dark color, as I’d been led to believe that natural dyes were pale imitations of chemical dyes; with the spring plants, though, the colors produced were pale imitations of their fall companions.
Dyeing safely
- Follow the safety precautions on the labels for handling mordants.
- Always wear a dust mask and gloves and work in a still room or box when handling mordant powders to avoid inhaling the particles.
- Protect your skin and eyes from mordant solutions.
- Never use your dye equipment for food preparation.
- Make sure your workspace is safe and take special precautions if you have young children or pets in your household.
Mordanting
To dye with plant material, a mordant is used to bond the dye to the fiber. I chose to dye two skeins with each plant, using one of two mordants on each skein: alum or copper. These were listed in the dye books as the least toxic though copper is considered mildly poisonous by some sources, and fortuitously, I already had the chemicals in my cabinet. I used A Dyer’s Manual (Ashmans, 1982) as my primary dye reference for the mordants.
For my initial samples, I used an unlabeled, worsted, two-ply millspun yarn that was stamped Crewel Needlepoint inside the cone. The yarn had a slight off-white color and was very lustrous (I suspect a Leicester breed). I wound off small skeins and weighed them. Twenty-four skeins weighed 4 ounces (the amount of fiber called for in the mordant instructions). I wound off two sets of twenty-four, one for each mordant. I marked the alum skeins with a tie of red cotton cording in case the dyed colors for the two mordants were too similar to tell them apart.
I mixed up the mordant solution according to the instructions and cooked half my skeins in each mordant. After rinsing, the alum skeins had not changed color, but the copper skeins were a light green. After dyeing, for most of the colors, the alum skeins were lighter than the copper ones.
I used a 4-quart roasting pan for dyeing that has a dial gauge so that it is easy to control the temperature. I did all of my dyeing outside on my back porch because the cooked plants often had a very strong odor.
Harvesting plants for the dyepot
I harvested the plants at the peak of their growth cycle: they had reached their full height and most had blooming flowers on the stems while some plants were nonflowering. I used the stems, leaves, and flowers and cut them in pieces to fit into my pan. I added water to cover the plants, weighted down with a metal mesh basket to hold them underwater. They were cooked at 200 degrees Fahrenheit until the leaves darkened and looked like cooked spinach. This usually took about an hour, but in some cases, I left the heat on for up to three hours. At that point, even if the leaves didn’t look dark, I unplugged the cord and let the solution cool in the pan, allowing the plants to steep longer.
When cool, I strained the liquid through a large strainer and poured it back into the roasting pan. I added two skeins of yarn, one for each mordant. I cooked this for an hour, let it cool, then rinsed the skeins in water with a drop of dish soap and hung them to dry.

Results
In comparing the results, one thing in particular stands out: the first-year results are significantly darker than those from the second year for both mordants. I thought of several explanations: in year two, we had little precipitation in the spring, which is usually our wet season, so plants did not grow as well; spring plants have not had as much time as late-summer plants to develop, so there isn’t as much dye material in the plants; or perhaps my mordanting technique was different between the two batches of yarn.
I was able to rule out the last one because I had some leftover mordanted skeins from the first year which were the ones I started dyeing with the second year. None of them were as dark as the first-year colors, and subsequent batches using the newer batch of yarns were similarly light. Determining what caused the differences in colors was an investigation that I did not pursue; I just accepted what I got.
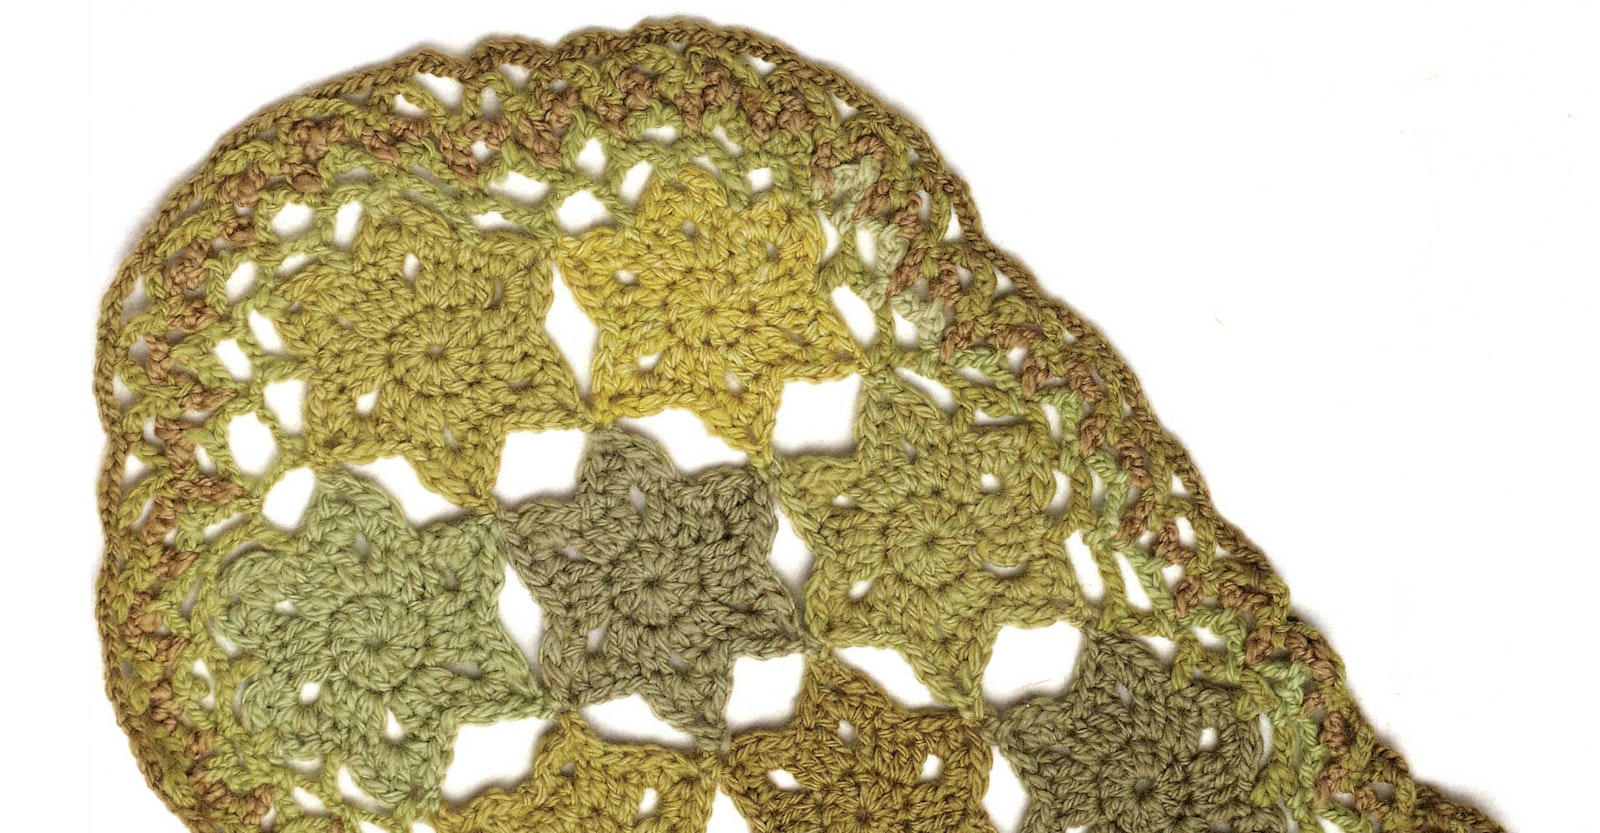
The first summer, I also wanted to dye enough yarn to complete a large project (Crocheted Star Scarf at the right). I had a large skein of off-white, lustrous handspun white yarn (breed unknown, another Leicester perhaps) that I divided into smaller skeins. I dyed the additional skeins in the leftover liquid after the sample skeins were removed. All of these yarns were mordanted with alum, and as I expected, colors in most of these yarns came out very light. I also dyed a few millspun white sock yarns. There was one millspun Merino/nylon blend yarn that was significantly darker than the rest.
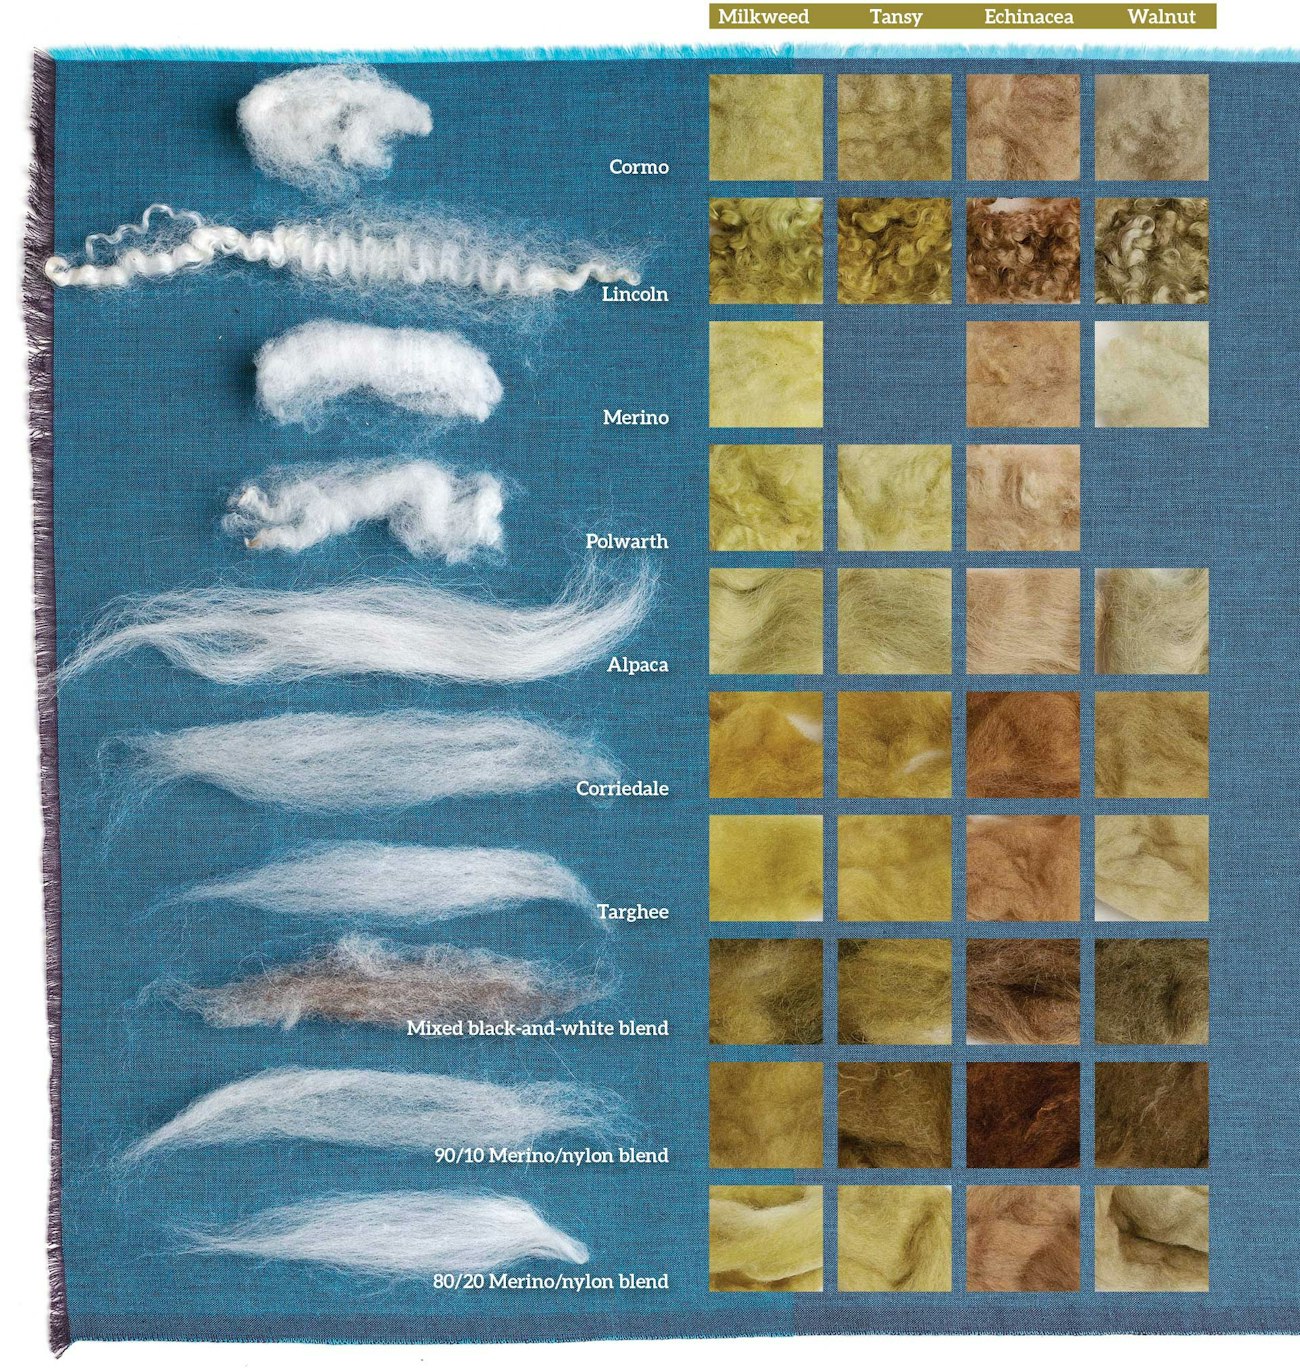
The second summer, I added unspun fiber to my dyepots. I chose different fibers to see how well each accepted the colors. When dyeing fiber, it is critical to filter out any small plant bits in the liquid so that this debris does not get tangled up in the fiber. After cooking the plants, I strained the liquid first through my large strainer, then a second time through a fine tea strainer before adding the fiber to the dyepot.
The fiber samples I used were locks from various fleeces and combed top from several different fibers and fiber blends. I dyed these using four plants: milkweed, tansy, echinacea, and walnut, all with a copper mordant. One of my nylon blends and the longer locks from the luster wools dyed the darkest; these were the 90/10 Merino/nylon blend, the Lincoln locks, and the Corriedale top. All the other fibers were much lighter and very similar in color.
This year’s dyeing is done, and I have used up my sample yarn. I have not run out of plants, however, so there may be more colors in my future.
Resources
- Bliss, Anne. North American Dye Plants. Loveland, Colorado: Interweave, 1993.
- Eckman, Edie. Beyond the Square Crochet Motifs. North Adams, Massachusetts: Storey, 2008.
- Goodwin, Jill. A Dyer’s Manual. Hessle, East Yorkshire, United Kingdom: Ashmans, 1982.
- Whitson, Tom D., and L. C. Burrill et al. Weeds of the West. Laramie, Wyoming: Western Society of Weed Science in cooperation with the western United States land grant universities Cooperative Extension Services and the University of Wyoming, 1996.
When the weeding is done, Lynn Ruggles, of Boise, Idaho, is concocting very smelly potions from her compost pile. Her friends sometimes detect an earthy smell when she spins green fibers into earth-tone yarns. Instead of searching out new fibers, she is now on a quest for new botanical specimens.
This article was published in the Spring 2014 issue of Spin Off.

