After I completed my first handspun vest, socks became my next project. They seemed like the perfect companion to the vest, and I wanted to use up the last twenty-ish yards of leftover vest yarn, spun from commercial wool and silk top, so I bought more of the same fiber and began planning.
Step 1: Plan Your Socks
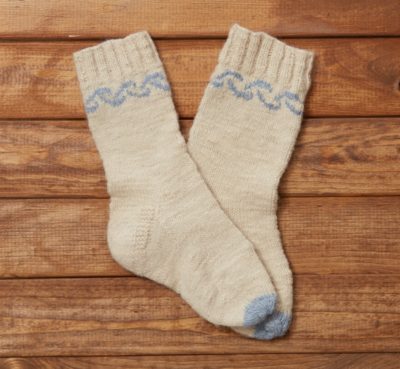
This was simple: use an existing sock pattern and add the colorwork motif from my vest. Since the vest was periwinkle with a cream motif, the socks would be cream with periwinkle accents. Way to use up those last few yards of vest yarn, Deb!
Step 2: Plan Your Yarn
I already knew that commercial sock yarns contained durable fibers, had more than one ply, and had tight twist. All these attributes help them stand up to the wear and tear socks experience. So for my main yarn, I planned carefully. The silk in my fiber blend would add some strength, and since it was top, I could easily spin worsted-style for the singles. Two plies seemed adequate for the finished yarn, especially if I added some extra twist while I plied. It didn’t matter if my contrast yarn—the periwinkle singles from my vest—differed from the main yarn, because it would only be used below the cuff ribbing and the toetips.
Step 3: Make the First Sock
It was time to start! Singles, plying, and finishing all progressed smoothly; I knitted a gauge swatch so I could match my yarn to a sock pattern. All systems go! I’d created a 2-ply yarn at a grist suitable for socks! I cast on for the first sock, tweaked a few parts of the pattern, and finished it. Because I hadn’t yet mastered Kitchener stitch, I finished the toe as if it were the top of a hat. This left a small “blowhole” to let air circulate around my feet, which has got to be healthier than closed socks, right? (Yes, I can rationalize anything.) That sock fulfilled my artistic vision for it: a snug fit on my short, wide feet without feeling loose around my ankle, and it coordinated beautifully with my vest. Plus, healthy blowhole!
Step 4: Learn a Valuable Lesson
The first sock used up all the yarn I’d made, so I opened my bag of fiber and made more for the second one—without measuring the first batch of yarn in any way, without making a control sample, without checking the angle of twist as I plied. It seemed obvious that, if I could make a sock yarn once, I could do it twice just from memory! I proceeded to knit the second sock without making another gauge swatch. And then I tried on my socks.
You can see from the photo that, where Sock 1 (left) was sock of my dreams, Sock 2 (right) was its evil twin. I hadn’t matched grist (generally measured in yards per pound) on the two batches of yarn, and I hadn’t matched knitting gauge on the two socks. Since the second skein of 2-ply was so much thicker than the first, I probably couldn’t have matched gauge. It wasn’t a sock yarn and it never would be.
Lesson: Measure as You Spin
Classic rookie mistakes led to disaster with that second sock, and a little knowledge would have helped me a lot. A control sample for the first batch of singles would have helped me make the second batch. I could have measured wraps per inch for the plied yarn. A scale might have alerted me to differences in my yarn: though the skeins of 2-ply might have looked similar in size, the fatter skein would weigh more. Finally, a McMorran yarn balance would have indicated that the skeins differed in grist.
I wore my handspun socks a few times, but found I had to constantly tug up the evil twin as it pooled around my ankle. I finally gave up on wearing them and instead hung the pair on the wall as a reminder of what this sock failure taught me. Now I advise newbie spinners to get our eBook “Taking the Measure of Handspun Yarn,” which collects Rita Buchanan’s essential lessons from SpinOff about all the above measurements. Even if you’ve got easy access to back issues of the magazine, it’s handy to have the articles in one spot.
Beginners can also benefit from videos and digital downloads that didn’t exist in 1996. (YouTube hadn’t even been invented yet.) Set yourself up for success by learning from spinning masters such as Kate Larson, Abby Franquemont, and Anne Merrow, editor of SpinOff. Their videos Beginning Spinning on a Wheel, The New Spinner’s Guide to Troubleshooting, and The New Spinner’s Guide to Plying are available in a specially priced bundle called the New Spinner’s Guide to Fundamentals.
Next time, we’ll consider texture, plying, and dyeing in another vest project. Teaser: dyeing and texture worked well, but plying needed help.
—Deb


