
Sample, Sample, Sample

Before we travel back to the beginning of my spinning-to-knit days, I’d like to show off one of my more recent finished creations: the Silversmith cardigan by Meghan Jackson. (I’m hoping this project will give me a little street cred. If I began the series with my first-ever garment, you’d never take my word on anything.)
Generally speaking, making a handspun, handknitted project from scratch involves five steps, with the last four dependent on your first big decision:
Make a decision: will you pick the knitting pattern first and spin for it? Or make the yarn and then find the perfect pattern?
Acquire the fiber and prep it for spinning.
Plan the yarn—making control samples along the way—and make a mini-skein for testing. (In other words, spin and finish a small amount of yarn, then knit a big swatch. Evaluate the swatch and repeat this step as often as needed until you’ve created the yarn you want.)
Spin the project yarn, constantly checking against the control sample. Finish the yarn with the same methods used for your test skein(s).
Knit the pattern.

About 75 percent of the time, I don’t have a specific pattern in mind when I start spinning; I want to practice a technique or achieve a good sock yarn, but that’s as far as my planning goes. Plus, it’s easier to let the fiber tell me what it wants to become than to try matching a particular yarn. (You’ll soon notice laziness cropping up constantly in my spinning decisions.) Since I typically make the yarn and then select the knitting project, the yarn can sit around for years before knitting begins. I spun the yarn and knitted my Silversmith cardigan in 2013, waiting to choose a pattern until I completed the yarn. Silversmith came together absurdly quickly, thanks to my passion for this yarn and garment.
Spinning Lesson: Check Your Control Sample!
The roving, a natural-color blend of 75 percent BFL and 25 percent tussah silk, came from Three Waters Farm early in 2013. By April, it had become 1,500 yards of a two-ply light fingering yarn at 16 wpi, and I may never have enjoyed spinning more. That blend of fibers in a high-quality top drafted like a dream.
Since the roving was ready to spin and I wasn’t trying to replicate an existing yarn, steps 2 and 3 above got short shrift, except for the last part of step 3. I’d set a goal of spinning a consistent skinny 2-ply, so I made a control sample and committed to using it (yep, still working on consistency after all these years).
How to Make a Control Sample
Amy Tyler explains the process of making a control sample in depth (with pictures) in her article “Improving Consistency” from Spin Off Fall 2015, so here’s a short description: Spin for a while, then pull 12 to 24 inches off the bobbin and hang an orifice hook in the middle of the pulled-off length. The hook’s weight will make the yarn twist around itself. If you like the resulting 2-ply, cut the sample off the wheel and set it aside for reference. If you don’t like it, adjust your spinning (tension, amount of twist, or singles weight) and test again until you’re happy. When you start a new bobbin or adjust something in your spinning, work for a little while before pulling off so that you’re in a groove. (You know how yarn at the beginning or end of a bobbin doesn’t look like the stuff in the middle—it’s the same principle here.)
It’s also helpful to keep notes, in case there’s a long delay between spinning sessions. A spinning teacher taught me to tape my control sample to an index card, noting down the wheel, whorl size, takeup method, and other key details. Some of my wheels can switch between Scotch tension and double-drive, and nearly all of them have different whorl sizes. For my e-spinner, I indicate the motor speed.
For this yarn, that control sample was the key to success: I frequently checked singles against it and achieved a high level of consistency. Who would have thought making and using a control sample would lead to better results? I spun the singles while binge-watching a highly suspenseful show (Orphan Black) and finished the singles in record time because I couldn’t turn off the TV. Like many people, I spin more evenly when I’m not watching my hands—BUT constant reference to my control sample made the yarn more consistent. Plying also went smoothly: though I didn’t check angle of twist as I worked, the knitted fabric doesn’t reveal any of the glaring abnormalities that sometimes mar my handspun garments. I must have been subconsciously counting my treadling as I worked. Or I just got lucky.
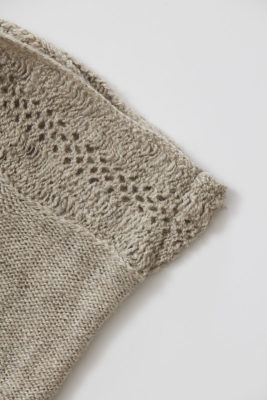
While I may never have the talent or work ethic to spin yarn for a wedding ring shawl, I did meet my goal with this yarn. The lace edging on the front of this cardigan looks like lace, yet it shows off the character of a handspun yarn.

With light placed behind the knitted fabric, it’s easier to see the yarn’s consistency.
Knitting Lessons: Swatching, Sizing & Fixes
The Silversmith cardigan perfectly suited this yarn and my figure: waist shaping, raglan sleeves, and a dramatic lacy scarf collar. I wear it with or without a shawl pin at the waist; it looks great either way on my petite rectangle figure.
Swatching revealed that I couldn’t match the pattern’s gauge and still get a drapey fabric. But my secret weapon, an iPad app called Knittrick, showed that if I went up a sweater size, the finished garment would fit perfectly at my preferred gauge.
I followed the pattern as written, and the raglan shaping created a well-fitting armhole despite my funky gauge. The top-down design made it easy to adjust sleeve length—my stubby little T-rex arms always necessitate this modification, so I’ve become a master at recalculating decreases for shortened sleeves.
Dart detail.
I finished knitting in about seven weeks (can you say “highly motivated”?). It’s the perfect lightweight cardi for fall. Only one thing bothered me: the collar at the back was too long to fit my neck snugly. Since this top-down sweater pattern begins with the collar, ripping out wasn’t really an option. After three years, I got tired of this poor fit and sat down at my trusty sewing machine. A machine-sewn dart at the back neck improves fit tremendously. I now love wearing my sweater again!
For more tips on spinning for sweaters, download Get More Spun: Spinning to Knit Large Projects.
Next time, we’ll look at one of my older handspun, handknit creations . . . and it might not be so pretty.
—Deb