
Many spinners prefer spinning short forward draw from combed fiber to produce worsted yarns that are dense and smooth. However, many may not want to invest in the large wool combs necessary for preparing top at home. Minicombs and flick cards make it fairly easy to prepare locks of fiber for spinning yarns that are not quite as dense or smooth as true worsteds spun with short draw. This article focuses on the basics of minicombing; for more details, see Robin Russo, “Combing: Organizing Fibers to Spin” in Spin Off, Summer 2004. You’ll also find a quick introduction to flick carding in the Fall 2006 issue of Spin Off on page 29.
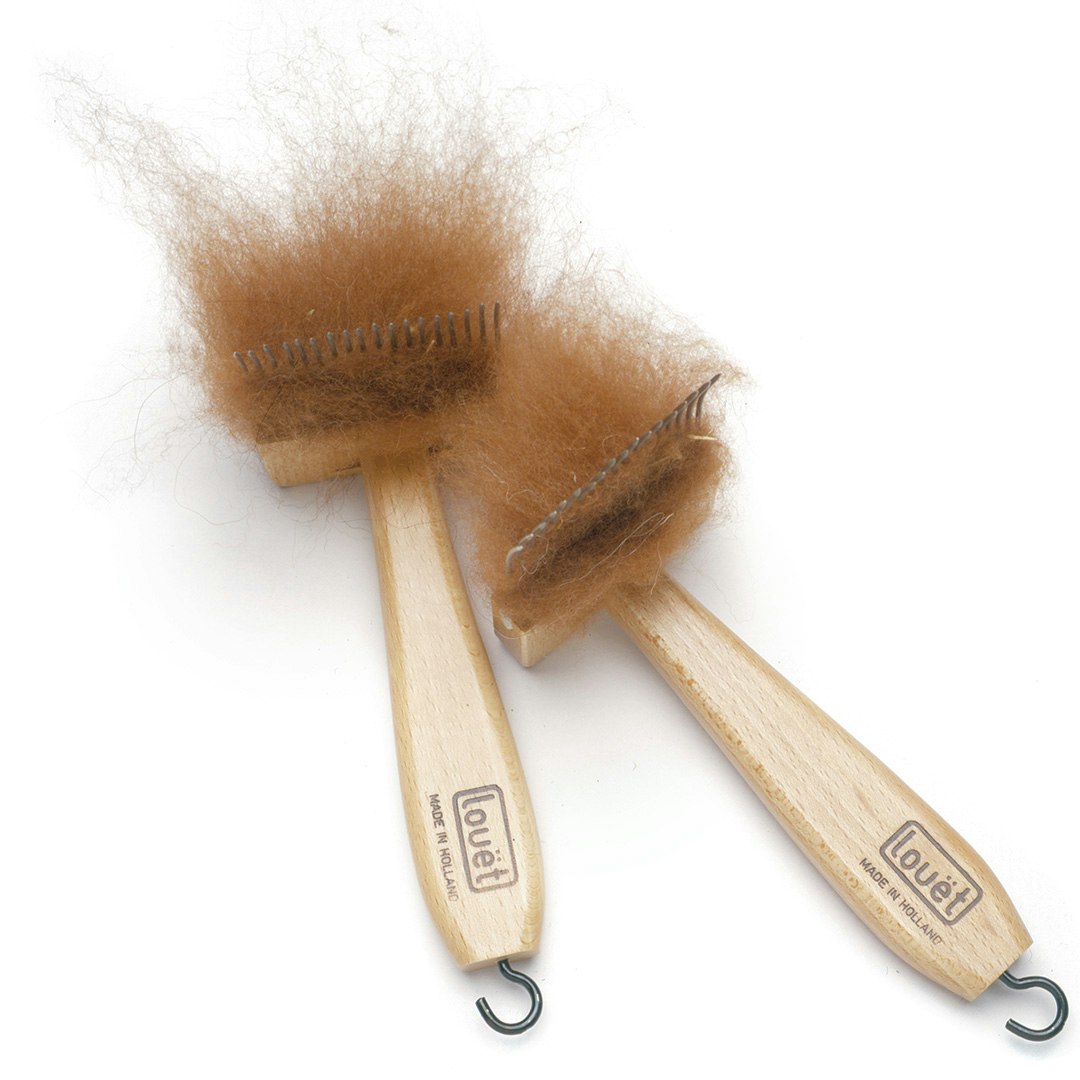
Fiber loaded on a pair of minicombs.
I consider yarn spun short draw using these preparations to be semiworsted. Because not all short fibers are removed, the yarns may have a bit of loft not normally found in a true worsted. Nonetheless, these yarns are denser and less fuzzy than the typical woolen yarn because the fibers are kept relatively parallel during preparation and spinning.
There is disagreement among the experts about what preparation precedes short-draw spinning to achieve semiworsted yarns. Mabel Ross defines semiworsted yarn as “spun by the shortdraw method (including ‘point-of-contact’ style) but from medium length fibres either not truly parallel, or containing short fibres amongst the long.”1 She lists drumcarded roving and rolags rolled so that the fibers remain parallel in addition to flick-carded locks as semiworsted preparations. Anne Field simply says that “semi-worsted yarn has the preparation of a woolen and the spinning method of a worsted yarn.”2 Alden Amos suggests spinning combed locks or sections of sliver from the fold for a semiworsted yarn.
Minicombs are handheld tools with one or two rows of tines about 2 inches long. The combs are 2-1⁄2 inches wide so only a small amount of fiber is processed at a time. The tines may be straight or slightly curved toward the handle. There are several brands of minicombs on the market. Since they can cost upwards of $75, it is worth trying out several models if possible to find a set that feels comfortable in your hands. Some models are designed so that the passive comb can be mounted, which can aid in removing the fibers. For the smoothest roving, use double-row minicombs.
For a smooth but somewhat lofty semiworsted yarn, choose a clean fine to medium fleece with well-defined locks 2 to 4 inches long. Long and coarse fibers can be difficult to control and may bend the tines out of shape. Wash the fleece so that the locks remain intact. I place about 1 ounce of locks, with all the tips facing the same direction, into a plastic net bag about 6" x 12". Secure the open end of the bag and submerge it in warm to hot water (the greasier the fleece, the hotter the water should be) and woolwash. Between rinses, lift the bag out, roll it up, and gently squeeze out excess water. To lay out the wool for drying, remove layers of fiber from the bag so that the locks stay parallel. Once the wool is dry, separate it into small groups of locks. Fibers other than wool should be washed and/or arranged in a similar manner. To protect the tines from bending, use only fibers that are easily opened. If necessary, open tip and cut ends by hand, working from side to side of the lock to maintain lock formation.

1. To load the combs, catch the cut (butt) end of the barely separated fibers (too much teasing and the lock structure is lost) in the tines so that only a very short length appears at the back (near the handle).
2–3. Layer the fibers until they cover about half the height of the tines. Be sure that the fibers don’t overflow at the sides of the comb. With the empty comb’s tine tips, lift the fibers away from the base of the tines. Keep the fibers away from the base as you work. If there is resistance as you comb, remove some fiber. Combing should be smooth and easy.
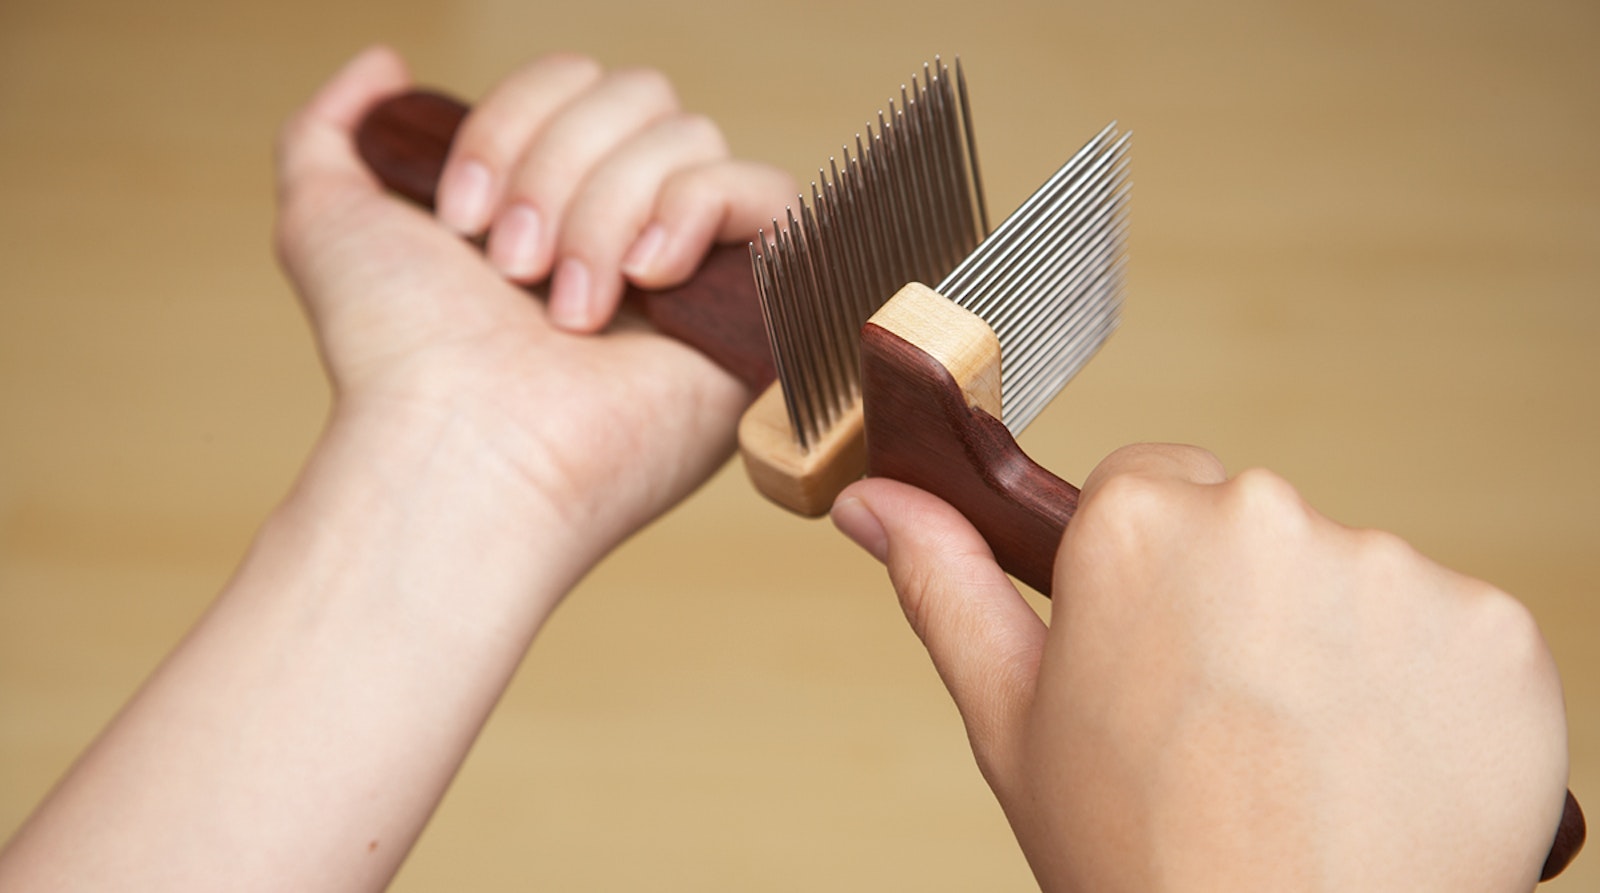
Hold the comb loaded with fibers by placing the handle in the palm of one hand and wrapping your fingers toward you over the handle. Curl your thumb around the end of the handle. I like to work with my forearm resting on a padded chair arm so that the passive comb remains steady with tines upright. The active comb is held with the tines perpendicular to the upright tines of the passive comb; the tines face away from you. Grasp the empty comb’s handle in your palm with your thumb bracing against the lower edge of the wood tine base.
4. Begin combing by moving the empty comb away from you and through the outer (tip) ends of the fiber mass.
5. The second pass goes a bit deeper into the fibers. Continue combing a little deeper in with each pass of the active comb but do not allow the tines to touch as you get close to the base of the fibers. The tines of each comb should be at a right angle to those of the other. Discard the short, dirty wool left on the passive comb. If the combed fibers are getting out of control, remove some to save for another comb load. Reverse hands on the combs so that you can comb the fibers just transferred to the comb that was originally empty. For me, the passive comb (with the fiber) is always in my left hand and the active one is in the right hand. Don’t forget to lift the fibers away from the base of the tines to prevent the teeth nicking the wood and being damaged; it can also be tricky to comb through fibers that are drooping down at the base. Comb as described above until the fibers are aligned and most if not all short fibers are removed. Usually three or four transfers prepare the fibers well.
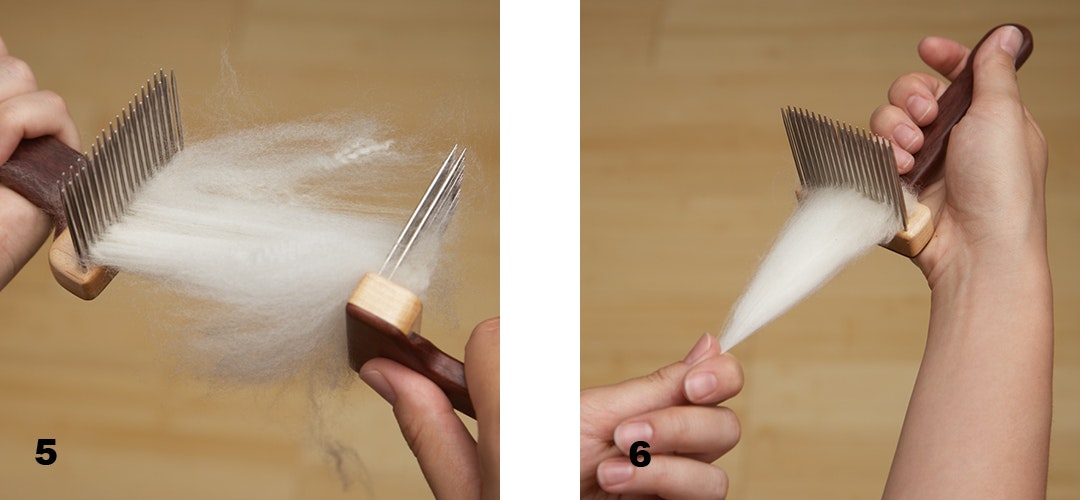
The next step is removing the fibers. Work slowly and gently—this step takes practice to produce a smooth, even sliver (an untwisted strand of prepared fibers).
6. Bring the fiber tips into a point.
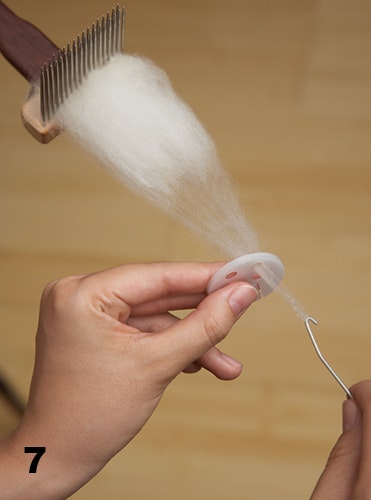
7. Gently pull the point a few inches toward yourself. For a smoother and more even sliver, pull the fibers through a diz (a disk with a small hole; a curved diz should curve toward the comb).
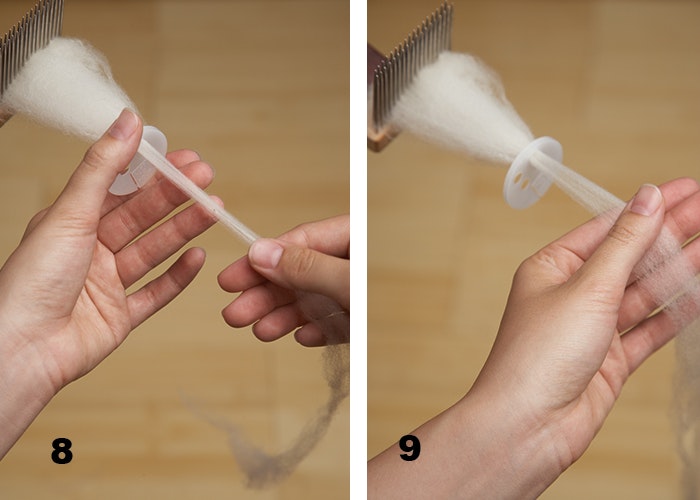
8–9. If possible, secure the comb by clamping it to a table so that you can pull the fibers, 1 to 3 inches at a time, alternating hands. When one hand has pulled the fiber forward, the other can move the diz back toward the comb (not too far or you won’t be able to pull the fibers through). I like to pull the fiber so that it is in proportion to the desired yarn size—the finer the desired yarn, the finer the sliver. If the fiber is drafted too fine, it will just drift apart and if drafted finer than your desired yarn, you will have to spin multiple slivers together to get the thicker yarn desired.The preparation may take more time, but the spinning will be a breeze.
You can let the sliver drop into a smooth box or basket or onto the floor as you work. When all the fiber has been removed, except for noils or tangled fiber at the very end (discard those bits), roll the sliver around your hand into a little nest. As you do this, you add a small amount of twist. Now you have a roving from which to spin.
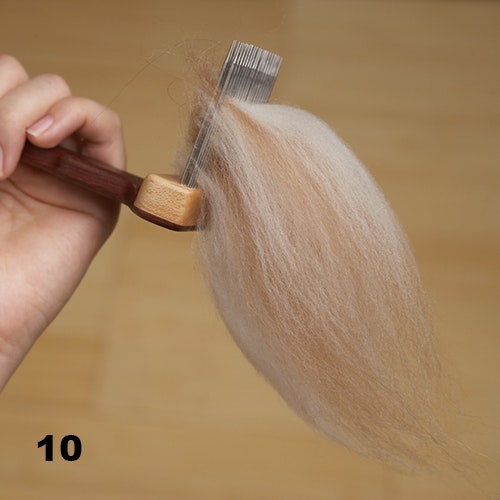
10. Minicombs can also be used for blending. Alternate layers of the fibers to be blended, making sure you don’t overload the comb. I find it is easiest to blend fibers of equal length and diameter. If the fibers are not the same length, the longer ones will draw off first and your roving will have mostly the longer fiber in the first half and a mix of primarily shorter fibers in the second half. You may need to do an extra transfer or two for a thorough blending or very little combing if you start with already combed top. If you have single- and double-row combs, you can do a “rough” combing with the single-row combs and then finesse the blend with a transfer or two on the double-row combs.
While minicombs won’t separate coarser from finer fibers in qiviut, cashmere, camel, or buffalo as well as commercial processes do, they certainly are more efficient for the task than removing the fibers by hand. If you have trouble spinning fine, slick luxury fibers from the locks, combing them for two or three transfers will make it easier to draft the fibers when spinning.
The keys to successful minicombing are clean, open fiber in small amounts and gentle work. You can spin wonderful yarn from this preparation: smooth and even but with a nice hint of loft.
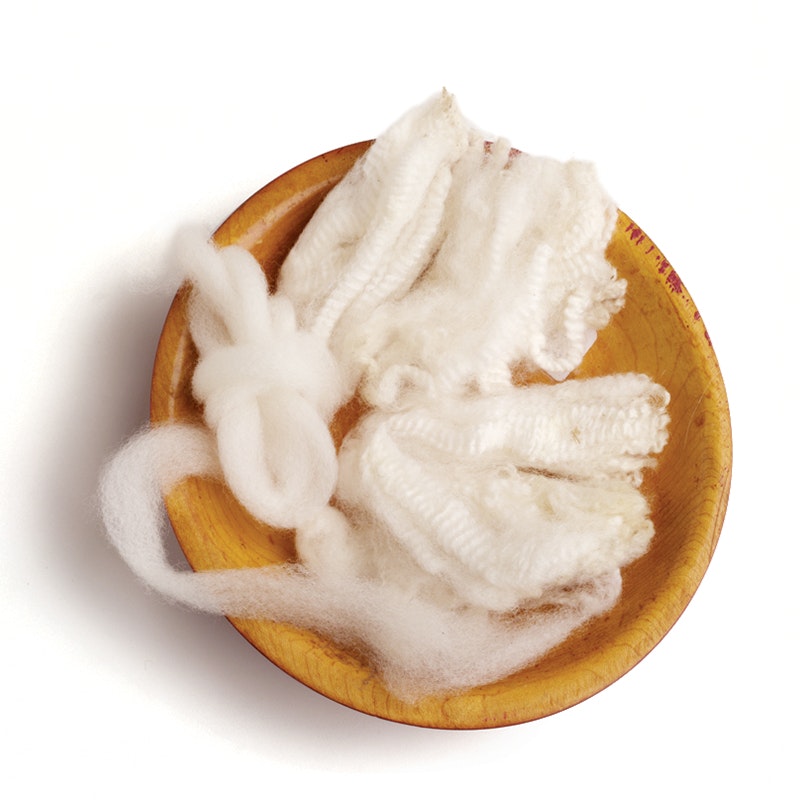
Top to bottom: White Australian Merino wool locks ready to use for combing;“nest” of white Merino roving drawn off combs without a diz.
Safety
Minicombs, while small, can be dangerous. Be sure they are kept out of the reach of children and do not leave them out with tines pointed upward. Work carefully so that you don’t stab yourself with the tines, and keep your tetanus shot up to date just in case an accident occurs.
Resources
- Amos, Alden. The Alden Amos Big Book of Handspinning. Loveland, Colorado: Interweave Press, 2001, 166.
- Field, Anne. Spinning Wool: Beyond the Basics. Christchurch,New Zealand: Shoal Bay, 1995, 88.
- Ross, Mabel. The Encyclopedia of Handspinning. Loveland, Colorado: Interweave Press, 1988, 154. See entries on semiworsted and woolly worsted yarns.
Carol H. Rhoades became a Wisconsinite after many years in Austin,Texas. She prefers woolen yarns for knitting but has to concede that semiworsted preparation and spinning yield lovely sock yarns.
This article was published in the Fall 2007 issue of Spin Off.
Published November 10, 2017; updated February 3, 2021.